
 Home
HomeLED Shower Niche Guide High CRI Waterproof Spa Lighting
 Mar 02,2026

 SYP
SYP
You might already know that lighting is the “secret sauce” of high-end interior design…
But did you know the most overlooked opportunity for luxury is right inside your shower?
Creating a stunning LED shower niche isn’t just about sticking a waterproof strip to a shelf. It’s a precise blend of safety engineering and architectural aesthetics.
Get it right, and you transform a daily routine into a spa-level experience. Get it wrong, and you’re looking at moisture issues, flickering lights, and costly tile repairs.
In this guide, we’re cutting through the noise to give you the exact blueprint for success.
From navigating IP67/IP68 waterproof ratings to selecting high CRI 95+ fixtures that make your tile work pop, we’re covering the critical details most contractors miss. We’ll even show you how solderless LED connectors and 24V low voltage systems are revolutionizing safety in the wet zone.
Ready to elevate your bathroom renovation? Let’s dive in.
The Anatomy of a High-Performance LED Shower Niche
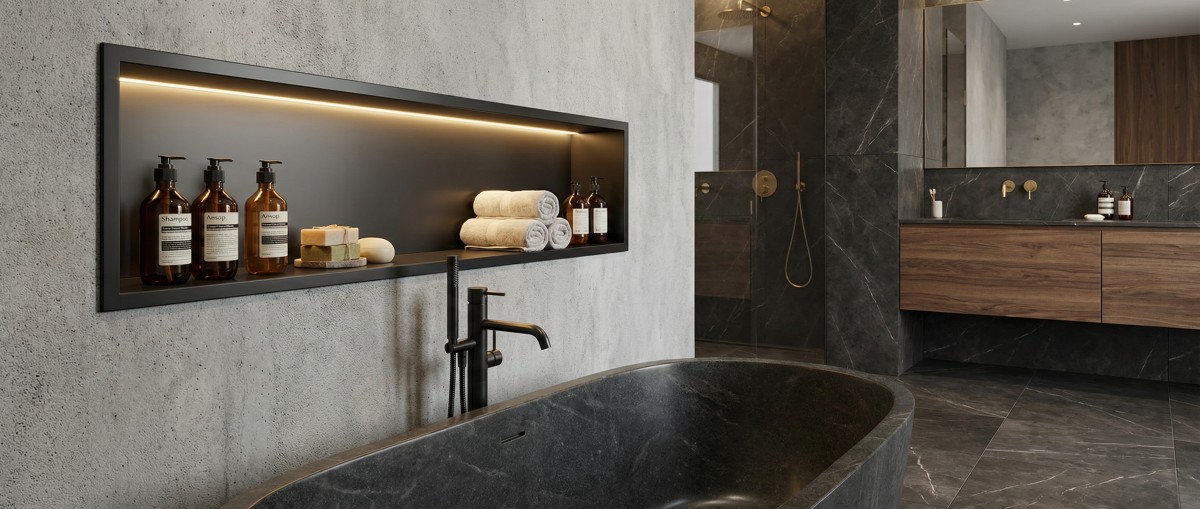
Creating a luxury bathroom isn’t just about picking the right tile; it’s about how that tile is illuminated. A high-performance led shower niche blends architectural storage with sophisticated mood lighting, but achieving that “high-end hotel” glow requires more than just sticking a strip in a hole. You need to understand the structural components that prevent hotspots, leaks, and technical failures.
The Profile: Recessed Aluminum vs. Surface Mount
The “bones” of your niche determine how professional the final result looks. I always recommend recessed aluminum profiles over surface-mount options for a truly integrated feel.
- Recessed Aluminum Profiles: These are built into the wall substrate before tiling. They sit flush with the tile surface, providing a sleek, modern finish that doesn’t catch soap scum or water.
- Surface-Mount Channels: These are easier to install as a retrofit but often result in a bulky lip that disrupts the clean lines of your shower.
For a premium shower niche with lighting, the goal is to see the light, not the fixture.
The Light Source: Achieving “Dot-Free” Diffusion
Nothing ruins a luxury aesthetic faster than seeing individual LED “dots” reflected in polished marble or glass tiles. To get a continuous, buttery-smooth beam, you need advanced light sources.
| Light Source | Why It Wins |
|---|---|
| COB (Chip on Board) | Features high-density LEDs that eliminate spotting even in shallow profiles. |
| Silicone Neon Flex | Provides 360-degree protection and built-in diffusion for a soft, ambient bathroom lighting effect. |
I prioritize Silicone Neon Flex for its extreme durability. It’s flexible, vapor-proof, and acts as its own diffuser, ensuring your linear lighting solutions look like a solid bar of light rather than a string of Christmas lights.
The Driver: Hidden Power for Safety
The dimmable driver/power supply is the heart of the system, but it should never be installed inside the niche itself. For safety and long-term maintenance, the driver must be located in a dry, accessible area—such as a nearby vanity cabinet or a linen closet.
- Accessibility: If a driver fails, you want to swap it out in five minutes, not tear out your custom tile work.
- Safety: We use a 24V low voltage system to ensure that even in a “wet zone,” the electrical risk is virtually zero.
- Performance: A high-quality driver ensures flicker-free dimming, allowing you to transition from bright morning task lighting to a low-light evening soak.
Technical Standards: Safety in the Splash Zone
When installing an LED shower niche, safety isn’t just a suggestion—it’s the foundation of the build. Mixing electricity and water requires strict adherence to specific ratings to ensure your “spa-like” retreat doesn’t become a maintenance nightmare.
Waterproofing and Voltage Essentials
I prioritize two main factors for every bathroom project: moisture protection and low-voltage stability. While many off-the-shelf strips claim to be “water-resistant,” only specific ratings provide true peace of mind in a wet environment.
| Feature | Standard Requirement | Why It Matters in the Shower |
|---|---|---|
| Waterproofing | IP67 or IP68 | IP67 handles powerful splashes; IP68 is rated for total submersion. |
| Operating Voltage | 24V DC System | Safer than 120V; provides more consistent brightness than 12V. |
| Color Rendering | CRI 95+ | Prevents tiles from looking “muddy” and keeps skin tones natural. |
A 24V Low Voltage System is the gold standard for modern showers. It carries significantly less risk than high-voltage alternatives and allows for longer LED runs without “voltage drop,” which causes the light to dim at one end. When you’re ready to spec your project, understanding how to purchase the right driver and strip combination ensures your installation meets these rigorous safety codes.
Visual Quality: CRI and CCT
Safety is about function, but CRI (Color Rendering Index) is about feeling. I always recommend a CRI of 95+ for bathroom environments. Cheap LEDs often have a low CRI, making your expensive marble or porcelain tile look gray or washed out.
- Vibrant Textures: High CRI brings out the depth in natural stone and the true pigment of your grout.
- Natural Skin Tones: Low-quality lighting can make you look sickly in the mirror; 95+ CRI ensures you see the most accurate version of yourself.
- The 3000K Rule: To achieve a cohesive look, match your niche CCT (Correlated Color Temperature) with your vanity lighting. A warm-white 3000K is the industry favorite for creating an inviting, high-end ambiance without feeling too yellow or too clinical.
For those looking to simplify the process, our magnetic LED solutions offer a way to maintain these high standards while ensuring the light source remains serviceable without ever having to touch your tile or waterproof membrane.
The SYPLED Advantage: Revolutionizing LED Shower Niche Installation
We’ve reimagined the led shower niche by removing the technical barriers that usually frustrate contractors and homeowners. Our goal was simple: create a lighting system that lasts as long as the tile itself without the typical “wet zone” headaches.
Solder-Free Technology for Wet Zones
Traditional wiring is the biggest fail point in bathroom lighting. We’ve eliminated that risk with our solder-free technology.
- Slim Solderless Profiles: Our connectors create a mechanical, watertight bond without the need for high-heat soldering.
- Reliability: By removing solder joints, we eliminate the primary cause of flickering or failure in high-humidity environments.
- Ease of Use: This “snap-and-go” system allows for faster installs and cleaner wire management behind the wall.
Product Spotlight: The SYP-WS04 Light-Emitting Shelf
If you want to skip the complex framing of a recessed box, the SYP-WS04 is your solution. This modern, light-emitting shelf acts as a plug-and-play alternative to traditional tiled niches. It provides a sleek, backlit shower shelf aesthetic that mounts directly to the wall, sharing the same high-performance engineering found in our precision cabinet light kits.
Precision Optics and Durability
We don’t just throw an LED strip in a channel. We use precision optics to ensure your shower lighting is functional and beautiful.
- Glare-Free Illumination: Our specialized silicone diffusers soften the output, preventing harsh reflections off glossy tiles.
- Uncompromised Durability: Every component is designed to handle the thermal expansion and contraction that happens in a hot shower.
- Visual Proof: To see how these components come together during a build, you can check out our product and installation videos for a deep dive into the tech.
| Feature | SYPLED Standard | Traditional Methods |
|---|---|---|
| Wiring | Solderless LED Connectors | Hand-soldered (Prone to corrosion) |
| Light Quality | Dot-free Silicone Neon Flex | Visible “hot spots” |
| Voltage | 24V Low Voltage System | 12V or High-Voltage (Less stable) |
| Installation | Plug-and-Play | Complex Manual Wiring |
Design Inspirations & Layout Strategies for a LED Shower Niche
When I design a bathroom, the led shower niche isn’t just an afterthought—it’s the focal point. The right layout turns basic utility into a high-end architectural feature that defines the entire room’s mood.
Horizontal vs. Vertical: Finding the Right Fit
The footprint of your shower usually dictates the orientation of your niche. Choosing the right one is about balancing storage needs with visual flow.
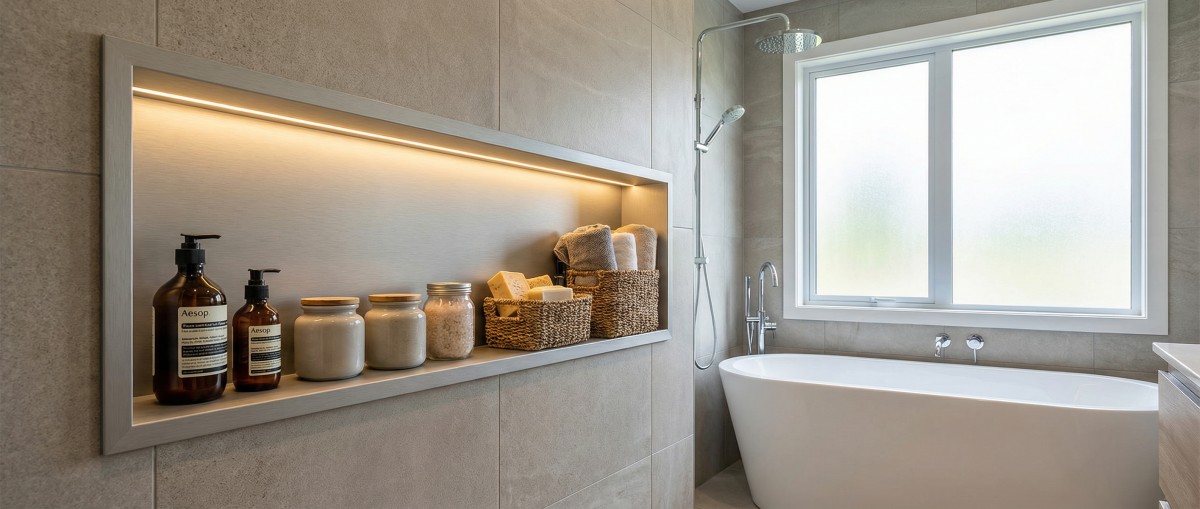
- Horizontal Layout: This is the standard for a reason. It draws the eye across the wall, making a standard 60-inch shower feel significantly wider and more open.
- Vertical Layout: Perfect for narrow stalls or walk-ins with high ceilings. It provides a “stacked” look that feels modern and makes great use of tall, narrow wall cavities.
- The Full-Wall “Horizon” Niche: For a true luxury feel, I recommend running the niche wall-to-wall. This “horizon” line creates an incredible sense of depth and provides a continuous, unbroken stream of light.
Hidden Glow vs. Direct Light
The secret to an “expensive” looking shower is the quality of the light diffusion. Nobody wants to see raw LED “dots” reflecting off their polished tile.
- Hidden Glow: We use anti-glare silicone diffusers to tuck the light source out of sight. This creates a soft, ambient wash that highlights the texture of your stone or tile without the harshness.
- Direct Illumination: If you want the light to be a design statement itself, using specialized <a href="https://www.sypled.com/shelf-lighting-v-shaped-led-strip-light.https://www.sypled.com/shelf-lighting-v-shaped-led-strip-light.html”>shelf lighting V-shaped LED strip light profiles allows the light to be angled precisely. This illuminates your niche contents perfectly while keeping the glare away from your eyes.
Our designs focus on a soft, high-end feel that feels integrated into the wall. You can find more layout templates and technical specs in our lighting product downloads to help plan your next project.
Professional LED Shower Niche Installation: A Step-by-Step Overview
Installing a lighted niche requires more than just plopping a box in the wall; it’s about precision and long-term reliability. I’ve refined this process to ensure that your led shower niche looks high-end and functions perfectly for years without risking the structural integrity of your bathroom.
The Pre-Wire Phase: Early Coordination
Before the cement board or waterproofing membrane ever touches the studs, coordination between the electrician and tiler is mandatory.
-
Low-Voltage Planning: Run
Before the cement board or waterproofing membrane ever touches the studs, coordination between the electrician and tiler is mandatory.- Low-Voltage Planning: Run 24V DC wires through the wall to the niche location early.
- Power Supply Placement: Keep the [LED power supply](https://www.sypledBefore the cement board or waterproofing membrane ever touches the studs, coordination between the electrician and tiler is mandatory.
-
Low-Voltage Planning: Run 24V DC wires through the wall to the niche location early.
-
Power Supply Placement: Keep the LED power supply in a dry, accessible location like a linen closet or vanity cabinet—never bury it behind the tile.
-
Rough-In Dimensions: Ensure the framing accounts for both the niche box and the integrated LED channel width.
Maintaining Waterproofing Integrity
The biggest mistake in shower lighting is breaking the “waterproof envelope.” When I install these systems, I treat the wire exit point as the most critical seal in the room.
- The Sealant Rule: Use high-grade waterproof sealants specifically designed for wet zones to plug the small hole where the wire enters the niche.
- Membrane Compatibility: Our systems are fully compatible with industry standards like Schluter-Kerdi and Wedi. Always wrap the niche flange with waterproof banding to ensure a 100% moisture-tight bond.
The “Serviceability” Factor: SYPLED’s Magnetic Solution
Traditional LED strips are often tiled in, meaning if the light fails, you’re breaking the wall. I’ve eliminated that headache. By using magnetic mounting profiles, our LEDs can be serviced or replaced without disturbing a single grout line.
| Step | Task | Key Component |
|---|---|---|
| 1 | Framing | Double-stud support for the niche box |
| 2 | Pre-Wire | 18/2 AWG low-voltage wire pull |
| 3 | Waterproof | Liquid membrane or fabric band seal |
| 4 | Tile | Mitered tile edges for a flush profile finish |
| 5 | Insert LED | Snap-in SYPLED light module |
Pro Tip: Always test the LED strip for at least 30 minutes before the tiler starts the final grouting. It’s much easier to fix a connection issue when the walls are still open!
Maintenance and Longevity of Your LED Shower Niche
Ensuring your lighting lasts as long as your tile requires a focus on thermal management and routine care. I always emphasize that while LEDs are efficient, they still generate heat that must be managed to prevent premature diode failure.
Heat Dissipation in Recessed Walls
In the enclosed space of a wall cavity, heat can become trapped. To keep your led shower niche running cool, we integrate high-grade aluminum channels that act as heat sinks, pulling warmth away from the light source. This thermal regulation is critical for maintaining the 50,000-hour lifespan of the system.
Cleaning and Protecting Silicone Diffusers
Over time, soap scum and hard water minerals can dull the glow of your lighting. Our silicone anti-glare neon LED linear light is designed with a smooth, non-porous surface to resist buildup, making maintenance straightforward.
- Weekly Wipe-Downs: Use a soft, damp microfiber cloth to remove residue before it hardens.
- Avoid Harsh Chemicals: Stick to pH-neutral cleaners; abrasive chemicals or heavy bleaches can degrade the silicone and sealants over time.
- Squeegee Habits: Just as you squeegee the glass, a quick pass over the led lighting bathroom wall mount storage shelf keeps the optics crystal clear and free of spots.
Pro-Active Protection for Longevity
| Task | Frequency | Benefit |
|---|---|---|
| Check Seal Integrity | Annually | Ensures the waterproof envelope remains intact around the profile. |
| Clear Ventilation | Monthly | Proper bathroom airflow reduces humidity levels that stress electronic components. |
| Driver Inspection | Bi-Annually | If accessible, ensure the power supply area is dry and dust-free. |
By following these steps, you protect the high-end look of your installation and ensure the internal components stay “cool” and dry for years to reach.
LED Shower Niche FAQs
Can I retrofit an LED light into an existing shower niche?
Retrofitting a shower niche with lighting after the tile is already installed is difficult because the wiring must be integrated behind the waterproofing membrane. For a seamless look, it’s best to plan this during the framing stage. If you are stuck with an existing niche, your only real option is a surface-mounted recessed aluminum profile if you can safely fish a wire through an adjacent wall without compromising the “envelope.”
What happens if the LED strip burns out behind the tile?
You shouldn’t have to break your tile to fix a light. We prioritize serviceability by using silicone neon flex housed in accessible channels. Our latest designs allow the light source to be replaced or serviced externally. We’ve highlighted these durability standards in our innovative LED collection for architects, ensuring that high-end installs remain functional for decades.
Do I need a special dimmer switch for niche lighting?
Yes. To achieve perfect ambient bathroom lighting, you must match your wall dimmer with a compatible dimmable driver or power supply. Most residential setups use ELV (Electronic Low Voltage) dimmers. Using a standard toggle switch or an incompatible dimmer will lead to flickering and can permanently damage the 24V low voltage system.
Is it safe to have electricity inside the shower area?
It is perfectly safe as long as you adhere to two critical technical standards:
- Voltage: Always use a 24V DC system rather than high-voltage AC to eliminate shock hazards.
- Protection: Ensure all components carry an IP67 or IP68 waterproof rating.
- Connections: Use solderless LED connectors designed for wet zones to prevent corrosion at the joint.
| Feature | Requirement for Safety |
|---|---|
| Voltage | 24V DC (Low Voltage) |
| Waterproofing | IP67/IP68 Rated |
| Light Quality | High CRI 95+ |
| Diffusion | Silicone Neon Flex (Dot-free) |
Will the heat from the LEDs damage my waterproofing?
Low-voltage linear lighting solutions generate very little heat. When mounted in an aluminum channel, the metal acts as a heat sink, dissipating any warmth safely away from the waterproofing membrane and tile adhesive. This ensures your vapor-proof fixtures stay cool and your shower’s structural integrity remains intact.
 Redefining Linear Spaces
  About us
 OUR PARTNER
 faq
faq Contact us